Since we began our Home Makeover for Renters series a few weeks ago, we’ve been focusing on doing a few small renovations in the bathroom. We talked about redoing the caulking, painting the walls, and now it’s time to talk decor.
Previously, our color scheme in the bathroom was white and navy blue with a touch of grey. This was fine, because it was simply what I had on hand when I first moved here. But at this point, I’ve come to realize that I don’t really like the color navy at all, and so it’s time for a change.
We have very little decor going on the in the bathroom, and it’s the way I like it. It’s way too humid in there to start overdoing it with decorative items, especially some that could get damaged. (We currently don’t have a fan in our bathroom, which you may have read in our previous blog post.) What we previous had was a painting by a friend, and a gifted wall hanging from another friend. They blended well enough and didn’t take away from feeling nice and relaxed in the bathroom. But somehow I knew I could improve the look of this bathroom, I just didn’t know how.
After much deliberation, I realized it wasn’t so much about what was on the walls that mattered, but how you felt when you entered the room. I wanted to focus on feel rather than on looks. How do I want to feel when I come into the bathroom? How do I want guests to feel? Happy, relaxed, comfortable.
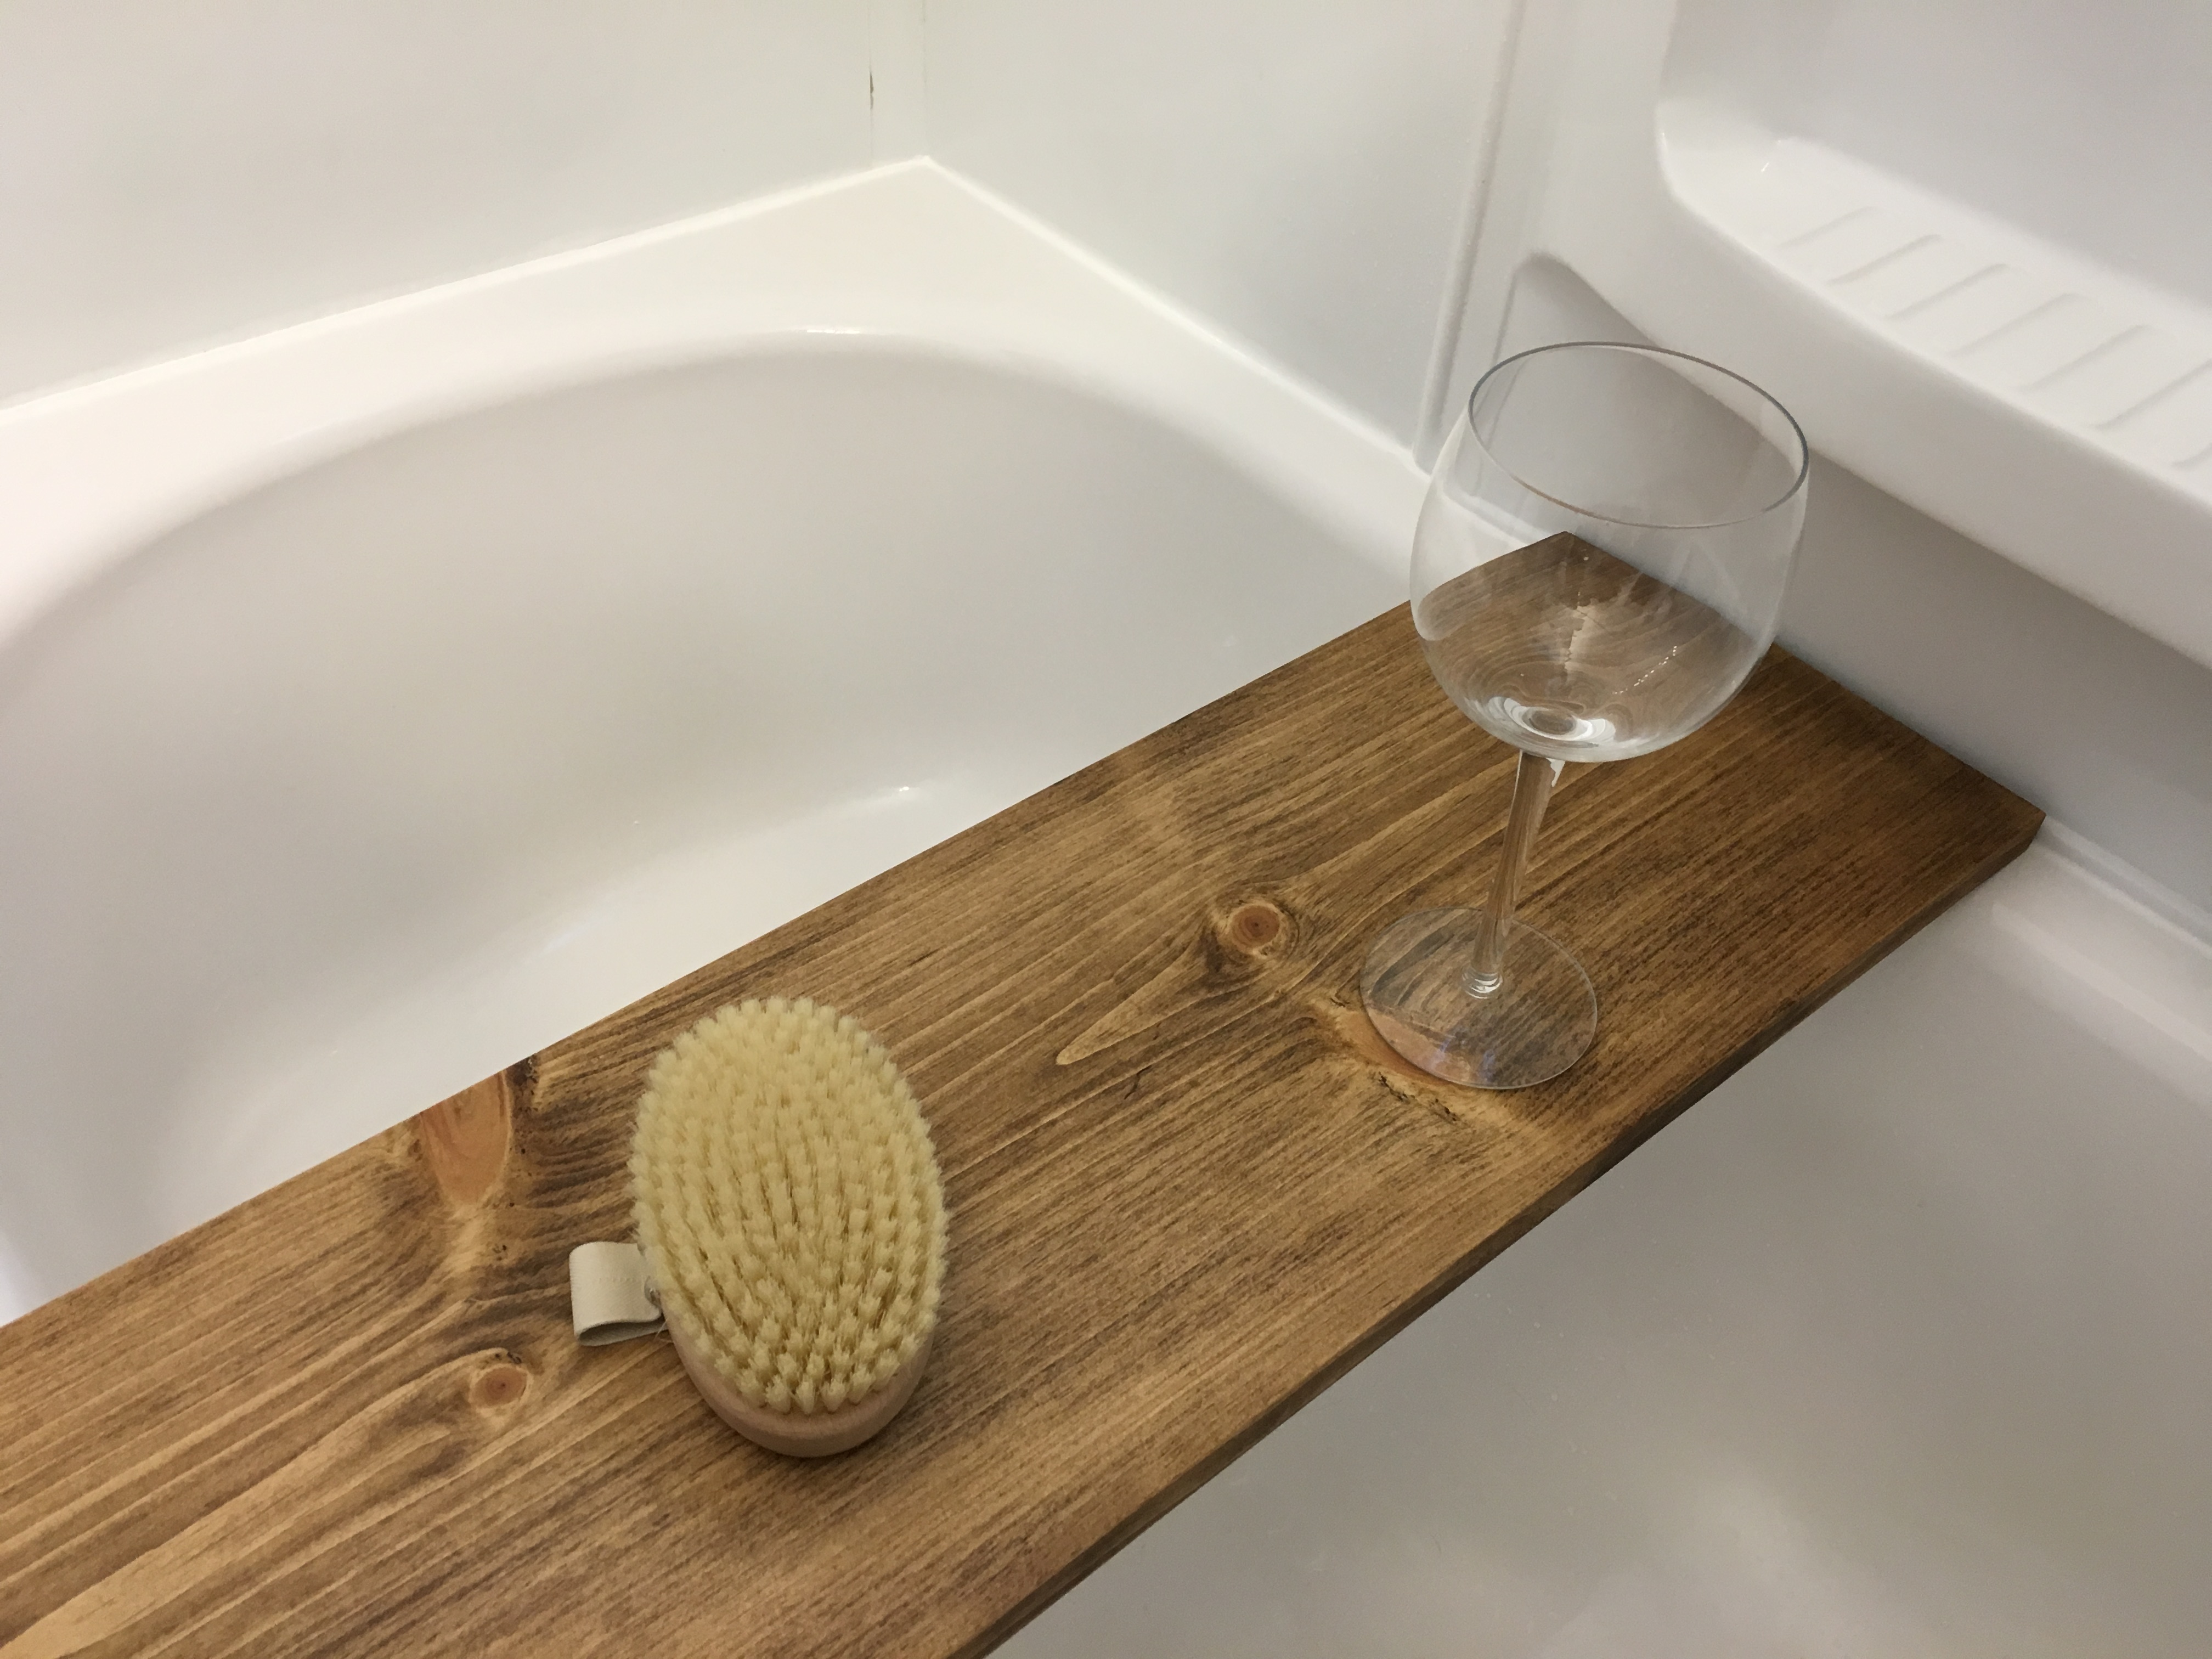
And then it hit me – I need to make myself a bath board!
DIY Bath Board
Given my limited expertise in DIY projects and handling tools, I decided it would be best to ask for some help. I asked both Max and a family friend (who is an interior designer) what kind of wood I should use, how I would go about staining it, how I could cut it, what tools I would need, and probably a million other questions. And fortunately, they both gave me lots of great answers that I will share with you today.
Materials Needed:
- Wood
- Stain & Sealer (easier to purchase these as a two-in-one product!)
- Cloth
- Brass Wood Screws
- Measuring Tape
Tools Needed:
- Table Saw
- Palm Sander
- Drill
Process
First things first, I told Max I wasn’t touching the table saw until he showed me how to properly use it. Fortunately, it’s a pretty easy and safe tool to use. Seriously, if I can do it, anyone can do it.
So after you’re comfortable using all the tools, it’s time to measure your bathtub to determine how wide your bath board needs to be.
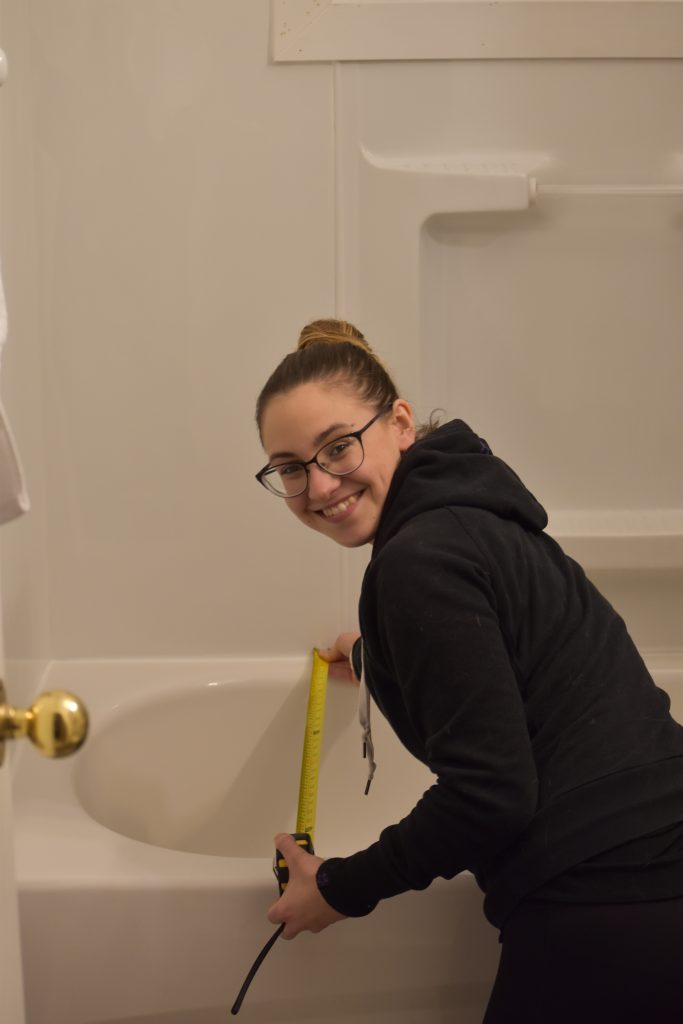
After I had the measurements written down, it was time to mark them on the piece of wood and start cutting. Don’t forget that you’ll need some extra pieces of wood for the bottom of your bath board so it doesn’t slide off! Next, you have to make sure that all the sides of the wood and nice and smooth. We did this by using a palm sander.
Before staining the wood, Max mentioned it would be best to drill the holes in the two small pieces of wood. We grabbed our drill and compared the drill bit sizes to the 1 inch brass wood screws I bought.
Now my favourite part – staining and sealing the wood to give it the perfect look!
You’re probably thinking the same thing I am, “But what are you going to do with a bath board once you move into your Tiny House?” Very good point… well why don’t we do a Giveaway then!
Bath Board Giveaway!
Tiny Adventures is giving away one (1) handmade bath board (retail price value of $100). The contest will run from today, March 3rd 2018, until March 9th 2018 at 11:59PM. The contest is open to Canadian residents only.
To enter the contest, you simply have to scroll to the bottom of this blog post and fill out the Rafflecopter Form. The only mandatory action to enter is leaving us a comment and checking off that you’ve done so – and you’ll have to give us a bit of your personal information so we can reach you if you win. Other options for extra entries will include Visiting our Facebook Page, Liking our Facebook Page, Following us on Instagram, Following us on Twitter, and Tweeting about the Giveaway.
The winner of this giveaway will be chosen at random on March 10th 2018 and will be contacted within the day. If the winner does not respond within 24 hours of receiving notification that he or she has won the prize, another winner will be drawn. Odds of winning will depend on the number of participants and entries in the giveaway.
Bathroom is on my to do list for a paint job and new sink and fixtures …
It was on our To Do list for the longest time, and I’m so glad we finally tackled it. Hoping you’ll be able to get to it, maybe after you’re done decluttering!
I would have a bigger bath tub if I could!!
That would be a dream come true!!
Great blog post! I feel like a bath now 😉
Thank you Sonja! And me too – I need to make time to take one this week!
Hey as long as he explained about kick backs with using a saw, go nuts!! That’s the thing with using the table saw that scares me the most but my husband stayed with me in the wood shop the whole time and I built something last summer !!
For our tiny 752sq ft house, if I could change one bathroom thing it would be to have the toilet next to the bathtub instead of the sink being next to it. I’d have the sink a lot larger over by where the toilet is, except it would be on the walk that has the light switch instead. Also would like the cupboard to be more accessible (it should have been on the opposite side cus then you’d be able to access the pipes etc
SIGH
Oh yes, he went into detail about kick backs! I think I’m just hesitant to use tools because they make me a bit nervous – I always expect the worse! It really helped that he was there with me, telling me how to do everything safely, and then getting me to do the cuts by myself so that I would actually learn to do it, not just watch and nod.
As for your bathroom, omg… that sounds like a lot of inefficient placement! D: But I know in smaller spaces sometimes things have to be set up a certain way for pipes/wiring/what-have-you.
If I could change something about my bathroom, it would be our storage situation! We can’t even keep our towels in that room.
I feel your pain! Every place we’ve ever lived has never had any storage in the bathroom. We do currently have a small cabinet, but not big enough for towels. Fortunately, they fit on top of the cabinet, I just need to stand on the toilet to be able to reach them. XD
I dream of the day that our bathroom looks and feels like a spa retreat. For now I accept it as is; a bath toy haven, with brown flower tiles, chipped tub caulking and in desperate need of a paint job, double sinks and air exchange system. I’ve done what I can by adding meaningful art to the walls, apothecary jars on the counter and decadent candles. When I get around to relaxing in the bath every few months I can close my eyes and just picture its potential – and its beautiful!
Every effort counts! It’s great that you added beautiful art and decor in the bathroom, it has a big impact on how you feel when you walk in there. I feel like every room is always a work in progress, so hopefully it will keep getting better from here on out. 🙂
Supet cute!!! I really like your bath board!
For me a big change in our bathroom that would make a world of a difference is a window! Of course, we can’t do anything about it now because we’re in a appartment but I will never again have a bathroom without a window!
Thank you Catherine! And omg, I know that feeling!! The last apartment I lived in had no window in the bathroom either, and it was the worst! >_< Maybe a beautiful bath board would brighten things up despite the lack of natural light? ;)
I wold love to repaint my bathroom.
Highly recommend it! It’s so easy and doesn’t have to cost a lot. Makes a world of a difference too!
Repair the bathtub
If I could change one thing in my bathroom it would be to add a jetted, soaker tub!
My brother was just saying the same thing! That would definitely be a great change!
GOODLUCK everyone and happy DIY!! I have a ton of pinterest stuff I want to try again this year. Our biggest project that we did together was an astronomy shed!!! It has a rolling off roof and everything. My kids both helped with it as well. And a few years ago I got hubby to help me put a double trellis up next to it for climbing plants (they keep dying lol, its like, -33C AGAIN today, so who can blame the plants, really!!) p.s. pinterest is quite evil
My sink. I would change the style.
Thank you for the wonderful post
[…] Can you believe we’re already a month into our Home Makeover for Renters? We decided to tackle the bathroom first. We’ve shared with you how we went about redoing the caulking around the bathtub and window, how we cleaned and painted part of the walls, as well as how we changed the look of our bathroom with some new decor. […]
Comments are closed.